Tuesday, May 31, 2011

DIY Up-cycling - How to make a laptop sleeve from a leather jacket

When purchasing my Macbook (which I love dearly) I decided to forgo the "and would you like to buy a case with that" - oh upgrades *sigh*. But in all honesty I said no to the upgrade because I knew that there are more unique computer cases available... of course the thought of creating my very own computer case crossed my mind, but I never seemed to get to it. Now here I am, one year later, with several scratches, an accumulation of crumbs, and still no case on my computer.Today I decided to crack down on finding myself a little inspiration to make my poor computer a case.
Here it is: A laptop sleeve from a leather jacket courtesy of Thread  Banger.

Happy Sewing!

What You Need:


- leather jacket with lining (or leather/other material + lining fabric, if you are not repurposing a jacket)
- quilt batting (I used Low-Loft crib-sized batting, and had quite a bit left over)
- 1 button
- black elastic cord 

- marking chalk
- leather shears
- fabric scissors
- matching All Purpose thread
- sewing machine needle for leather
- sewing machine needle for wovens
- hand-sewing needle (not needed if your button is not shanked) 
- leather/vinyl glue
- tape 


Step 1:
Place laptop on your sleeve material, right side up, front edge facing away from you. Trace around laptop on all sides, adding 1''.


Step 2:
Lift and rotate laptop up on its back edge towards you, then wrong side up on top of the material.  (Front edge will be facing towards you.)  Keep drawing 1" around all edges.  (I know this sounds somewhat confusing, so I included the diagram above to show how the material was measured.)


Step 3:
Cut the rectangle out of the material (cutting through both outer and lining if you are using a jacket), using leather shears.  If you do not have a lining, place this rectangle on top of your lining material, trace around, and cut using fabric scissors.


Step 4:
Cut a small piece of leather about 1" square


Step 5:
Unroll batting from package, and leave it doubled up as you flatten it out.  Place rectangle of material on top of the batting.  Cut a piece of batting the same size as the lining, then trim batting about 1/2" on the sides only.


Step 6:
Fold material rectangle in half, and machine-stitch the edges together, using a needle for leather and upholstery thread.  (Upholstery thread is not a must-have...but it is a lot stronger that regular cotton/poly mercenized, and is more suited to sewing leather and taking the stress of repeat usage.  Also, f you have a walking foot or Teflon foot for your machine, it can help the leather from sticking.)


Step 7:
Clip corners and turn right side out.


Step 8:
Fold lining rectangle in half, and machine-stitch the edges together, using a needle for wovens and regular thread.  This will make the lining into a "pouch." Do not turn right side out; the right side needs to remain on the inside.


Step 9:
Wrap batting around the outside of the lining pouch.  Fold upper edges of lining pouch down and overlap batting piece at top edges.  (Trim batting top edges if they are too bulky or long.) 


Step 10:
Machine-stitch the lining edges down over the batting, at about a 3/8" hem.


Step 11:
Sew button to the material pouch you made in Step 6), about 2" down from the top edge on the front of the pouch.

Step 12:
Slide the lining into the material pouch, and slip the laptop inside to check for sizing.  On the back side of the material pouch, tape one end of the elastic cord to the centre, about 2" down from the top edge.


Step 13:
Wrap elastic cord around button, and bring the other end to the back, cutting it and gluing it down next to the other end.  Make sure the cord is taut around the button and will keep the laptop from falling out.


Step 14:
Trim the cord to meet the taped-down end.


Step 15:
Re-tape cords down with the ends free.  Place a dab of glue under the ends and press them into it.


Step 16:
Remove tape and glue the small square over the ends of the cords.


Step 17:
Remove laptop and lining from the material pouch, and machine-sew the square over the elastic cord ends, first sewing a square around the edge, then an "X" shape in the centre.


Step 18:
Spread glue on the inside of the outer pouch, close to the top edge.  Turn down top edge about 3/8"; clamp until dry.


Step 19:
Slip the lining back inside the outer pouch, pushing the corners all the way in.


Step 20:
Stitch around upper edge of laptop sleeve to secure the lining to the outer material, using a needle for leather and upholstery thread.


All finished!


Monday, May 30, 2011

LOVE: Sew It All Magazine

You may or may not have heard of "Sew It All Magazine", if you haven't... prepare to be amazed!
Sheila mentioned their website today, and I clicked my way over to www.sewitallmag.com, after having a look I thought you'd all appreciate their work. They have tons to offer sewing enthusiasts: from a print magazine, to online blog, and pattern downloads, to their own show on PBS, these ladies LOVE TO SEW. 
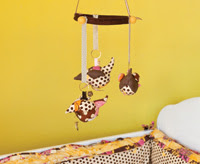
I found a few awesome patterns, some - very basic, others a little more complex. Check them out! In the mean time... Here's my pick: A pattern for a mobile bird watcher to hang over a crib or change table 
(very fitting for Urban Baby June!)


Happy Sewing. 

Wednesday, May 25, 2011

URBAN BABY JUNE

With all of this ugly weather out there, Vancouverites would never guess that June 1 is only a week away!! However, the team at SWFDS is ready for June, and as promised here's the OFFICIAL flyer for this months "Urban Baby June" workshop.
Come join us in the studio on June 26th to make a cute little baby tutu and an extra cuddly stuffed owl.
Limited spots are available so get at us quick to book a spot: 604.608.8939

Happy Sewing :)

Tuesday, May 24, 2011

DIY: Scarf Vest

I definitely have the biggest soft spot for anything/anyone New York. Perhaps due to it's history, or amazing fashion, maybe the big buildings, the great food, the wild lights, or even simply the people. Everyone I meet from NY never fails to surprise me. One of my mentors once told me "New York is the place where all the misfits go to fit in", this statement impacted my opinion of this city, emphasizing it's individuality. The amount of talent that grows in that city is beyond belief.
Today, I came across a unique NY DIY blogger and I wanted to share one of her DIY projects (this one's an easy one step!)
Be sure to check her out: Kirsten @ http://www.studs-and-pearls.com

Happy Sewing!

DIY Scarf Vest - One Step Project


Here's a look at what we'll be making!

Kirsten made this scarf below into a more wearable piece of clothing by simply cutting two slits. For this project it's all about where you cut the slits. The best part: you can still wear it as a scarf if you wanted too!

Scarves used for the project
What you need:
- Large square scarf or fabric
- Scissors
- 3 minutes!

Slits cut into the scarf

First and ONLY step:

Cut two diagonal slits on either side of the scarves midpoint.

Don't worry about making everything perfectly straight. You can tell just by looking at the above picture that Kirsten didn't cut them straight either. When worn the scarf will flow and fold withing itself - so being a few inches off won't matter at all.

Kirsten eyeballed her cuts without measurements, but as this isn't everyone style, included below are measurements for a 30x30 scarf. Adjust accordingly depending on the size of your scarf.


30x30 scarf measurments

You don't have to use a scarf... If you have a large piece of fabric laying around, by all means make that into a vest too!

Super easy!!

Thursday, May 19, 2011

Urban Baby June Workshop

Urban Baby June? Yes. Before you begin to scratch your head with a slight question mark crossing your mind, let me explain. At SWFDS, we tend to base our workshops on events that are directly affecting our lives, and recently many of our friends have announced that little storks will be brining them babies! The upcoming workshop "urban baby june", celebrates those delicate smiles, and heartwarming laughter. Join us on Sunday, June 26 for a sewing workshop teaching you how to make a stuffed owl and a baby tutu.

Happy Sewing! 

Stuffed Owl
Cost: $40 +HST
Time: 2-4pm

Baby Tutu
Cost: $25 +HST
Time: 12-1:30pm

Wednesday, May 18, 2011

DIY: Baby Changing Pad

For all of the new moms & dads out there... even for those of you looking to gift to a baby.
You may know that changing pads for babies can get expensive. To make it worst, most of the time the patterns aren't even cute! Don't worry, SWFDS is here to save you! Here's a DIY project for that new baby in your life.

Happy Sewing!


What you need:
- Vinyl Tablecloth (any size)
- Bias Tape: extra wide, double fold 1/2" (or you can make your own)
- Ribbon
- Flannel or Felt

Step 1:
Fold the tablecloth in half and cut into 2 pieces. Use the dimensions 26x20 because after rounding out and adding bias tape it is always much smaller. We need all the sides to have rounded corners, so use a bowl to trace around to cut off straight corners. Line rounded corners up to make sure that everything is even, if not trim the excess.


Step 2: 
Take flannel or felt and cut it to match your tablecloth with rounded corners.  


Step 3:
Next, you will sandwich your flannel into the 2 tablecloth pieces, you will do this with your right side of your tablecloth facing out. 


Step 4:
Now we can start adding the bias tape. In this project we will not be adding bias tape the "correct way" instead, we will sandwich it into the double fold and sew. Pin the bias tape all the way around the fabric. Bias tape has one side that is longer than the other, make sure you have the shortest width on top and the longer on the bottom so when you are seeing your stitches on the top you can be sure to catch all the layers on the bottom. Start your bias tape on the longer edge of your project. 


Step 5:
Start sewing on your bias tape. I put the edge of the bias tape at the edge of my foot and sewed at that distance. 


Step 6:
Once you get to the short side (about 3 inches away from the next unsewn long side), you will add ribbon ties. Cut the ribbon ties to 16" each, and heat seal the ends by running a lighter quickly underneath so the ribbon will not fray.  


Step 7:
To add your ribbon ties, put one ribbon on the bottom of your tablecloth and one on top, but make sure they are both INSIDE the bias tape, so once you sew the bias tape you will sew the ribbon in. 

Here's the ribbon sewn in on both sides
Step 8:
Continue sewing your bias tape all the way around. When you get back to where you started, trim off your bias tape about an inch past where your other ends starts. Fold your bias tape as neatly as possible and cover your other end by about 1/2" and sew over. (backstitch to hold stitching in place)


Completed Project:


Project found at: http://sewingorsomething.blogspot.com

Tuesday, May 17, 2011

DIY: Flower Girl Headpiece

SWFDS has themed May as bridal month, titling this months workshop "something made, something blue".
For all you brides, wedding goers, or even diy enthusiasts here's a cute headpiece project.
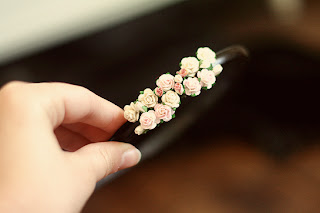
The headpiece takes around half an hour to make, and is done by simply wrapping wire-stemmed flowers (found at any craft store) around and old black headband (find at claire's/shoppers).

Happy Sewing!


What you need:
- Wire-stemmed flowers
- A black headpiece


wire-stemmed flowers - wrap the green stems around the headband

As you wrap the flowers around, you can chose to make any kind of pattern, this is where you get to be creative!

Finished Project


Project found at wishwishwish.net

Monday, May 16, 2011

SWFDS @ Epic Expo

This weekend the SWFDS team paired up with a few local designers at Epic Expo - hosted at the Vancouver Convention Centre. The event was created to exposed and encourage active businesses practicing sustainable living.

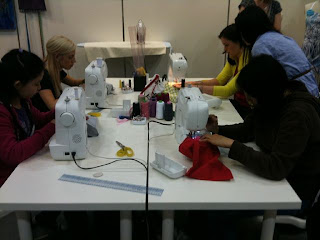
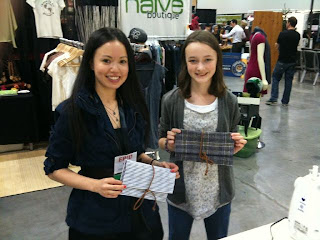
We had an amazing time! Clients, friends, and family were in and out all weekend sewing with us, and the new additions to the studio. Over the weekend we taught 3 different workshops: how to make an eco stash bag, a vintage clutch, and cute little rosebud hair clips.

Featured in our booth was custom artist Andrew Briggs, Davie & Chiyo clutches, Picasso Designs infinity scarves, and clothing by Nate Organics.

So many pictures were taken throughout the event - here's a look in case you couldn't make it!

In the SWFDS booth teaching a workshop
Sheila teaching the girls how to make rosebud hair clips
Stylist Robyn Wall is teaching the class how to make an eco stash bag
They made those!
Designer Booth
Picasso Design infinity scarves 
Rose bud hair clips
Sheila and Lisa with her rosebud hair clips
Andrew Briggs "ABC" Custom Designs
Davie & Chiyo clutches