Here are our DIY baby receiving blankets! Follow our tutorial to learn how to make this simple and inexpensive project!
Materials needed:
1.1 Metres of fabric (100% cotton in flannel or cuddle)
Sewing supplies needed:
Serger sewing machine (not pictured)
Fabric shears
Ruler
Measuring tape
Chalk
Circle reference (a mug or cup will work)
Instructions:
1. Decide what dimensions you'd like for your finished receiving blanket.
These instructions are for a 40" x 40" oversized blanket.
2. Lay fabric flat on the table.
3. Use a measuring tape to a 40" x 40" square (or whatever dimensions you've chosen). Chalk out your line and cut.
4. Take a mug or any circular object and line it up to the corner edges of the fabric.
Chalk the new rounded edge to all four corners.
5. Starting on a side not a corner, serge all the way around the blanket.
6. Trim off any excess threads from the serger and you're done!
For any questions, don't hesitate to drop us a comment below, send us an email or just visit us in studio!
Happy sewing!
Showing posts with label baby. Show all posts
Friday, July 29, 2011
Monday, June 13, 2011
DIY: Urban Baby June 1-2-3 Soft Blocks
As you may already be aware, this month our studio is celebrating "
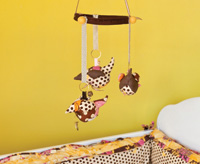
Urban Baby June"- A month committed to creating projects for all of the babies we know! My morning browsing brought me to find this diy project, 1-2-3 Soft Blocks for babies, I'm sure that little toddler you know would love to teeth on these!
DIY 1-2-3 Soft Blocks (click here for the full project)
by Adrienne Franklin
Pattern Level: Easy, some sewing experience helpful.
Finished Size: 3 blocks, 4", 6"& 8"
Seam Allowance: 1/2" used throughout and has been added.
Press carefully step-by-step and read instructions before
beginning.
Materials needed:
3/8 yard solid yellow
3/8 yard each of the following: medium blue print, red print, and
navy print
3 packages of pre-made piping, polyester stuffing, matching
thread, paper backed fusible web (wonder under).
Cutting and Assembly:
1) For the 4" block cut: 1 - 5" square of solid yellow and a total of 5 - 5" squares
from other prints. 4 pieces of piping 5" long, 2 pieces 22" long. For the 6" block
cut: 1 - 7" square of solid yellow and a total of 5 - 7" squares from the other
prints. 4 pieces of piping 7" long, 2 pieces 30" long. For 8" block cut: 1 - 9"
square of solid yellow and a total of 5 - 9" squares from other prints. 4 pieces of
piping 9" long, 2 pieces 38" long.
2) Trace the numbers onto the paper side of the fusible web allowing 1/4" space
around each number. Numbers are reversed and ready to trace. Cut out numbers
roughly around edges and following manufacturer’s instructions fuse the #1 to the
wrong side of the red print, the #2 to the wrong side of the navy print and the #3
to the wrong side of the medium-blue print. Cut out numbers along drawn lines;
peel paper and fuse, centering on yellow background squares. Stitch around
edges of appliqués using contrasting thread and a satin stitch.
3) Note: Use a zipper foot on your sewing machine to sew piping. To make one
block, sew a row of 4 squares, sewing squares right sides facing and sandwiching
a piece of piping into each seam. Raw edges of piping should be aligned with the
raw edges of squares as they are sewn. See fig. 1.
4) To form sides of block, sew beginning of row to end of row right sides facing,
sandwiching a piece of piping in the seam line as you sew.
5) For top of block, baste a piece of piping to the right side of 1 square around all
outer edges, having raw edges of piping even with raw edges of square. Taper
beginning and end of piping into seam line overlapping ends. See fig 2. Repeat
for bottom of block. Sew top and bottom squares to sides of block, right sides
facing and matching corners on top and bottom to seam lines on sides. Stitch,
pivoting at corners and leaving an opening for turning and stuffing. When both
top and bottom are sewn to block, turn right side out and stuff firmly. Slipstitch
opening closed. Repeat steps to make other blocks.
Monday, May 30, 2011
LOVE: Sew It All Magazine
You may or may not have heard of "Sew It All Magazine", if you haven't... prepare to be amazed!
Sheila mentioned their website today, and I clicked my way over to www.sewitallmag.com, after having a look I thought you'd all appreciate their work. They have tons to offer sewing enthusiasts: from a print magazine, to online blog, and pattern downloads, to their own show on PBS, these ladies LOVE TO SEW.
I found a few awesome patterns, some - very basic, others a little more complex. Check them out! In the mean time... Here's my pick: A pattern for a mobile bird watcher to hang over a crib or change table
(very fitting for Urban Baby June!)
Happy Sewing.
Thursday, May 19, 2011
Urban Baby June Workshop
Urban Baby June? Yes. Before you begin to scratch your head with a slight question mark crossing your mind, let me explain. At SWFDS, we tend to base our workshops on events that are directly affecting our lives, and recently many of our friends have announced that little storks will be brining them babies! The upcoming workshop "urban baby june", celebrates those delicate smiles, and heartwarming laughter. Join us on Sunday, June 26 for a sewing workshop teaching you how to make a stuffed owl and a baby tutu.
Happy Sewing!
Stuffed Owl Cost: $40 +HST Time: 2-4pm |
Baby Tutu Cost: $25 +HST Time: 12-1:30pm |
Wednesday, May 18, 2011
DIY: Baby Changing Pad
For all of the new moms & dads out there... even for those of you looking to gift to a baby.
You may know that changing pads for babies can get expensive. To make it worst, most of the time the patterns aren't even cute! Don't worry, SWFDS is here to save you! Here's a DIY project for that new baby in your life.
Happy Sewing!
What you need:
- Vinyl Tablecloth (any size)
- Bias Tape: extra wide, double fold 1/2" (or you can make your own)
- Ribbon
- Flannel or Felt
Step 1:
Fold the tablecloth in half and cut into 2 pieces. Use the dimensions 26x20 because after rounding out and adding bias tape it is always much smaller. We need all the sides to have rounded corners, so use a bowl to trace around to cut off straight corners. Line rounded corners up to make sure that everything is even, if not trim the excess.
Step 2:
Take flannel or felt and cut it to match your tablecloth with rounded corners.
Step 3:
Next, you will sandwich your flannel into the 2 tablecloth pieces, you will do this with your right side of your tablecloth facing out.
Step 4:
Now we can start adding the bias tape. In this project we will not be adding bias tape the "correct way" instead, we will sandwich it into the double fold and sew. Pin the bias tape all the way around the fabric. Bias tape has one side that is longer than the other, make sure you have the shortest width on top and the longer on the bottom so when you are seeing your stitches on the top you can be sure to catch all the layers on the bottom. Start your bias tape on the longer edge of your project.
Step 5:
Start sewing on your bias tape. I put the edge of the bias tape at the edge of my foot and sewed at that distance.
Step 6:
Once you get to the short side (about 3 inches away from the next unsewn long side), you will add ribbon ties. Cut the ribbon ties to 16" each, and heat seal the ends by running a lighter quickly underneath so the ribbon will not fray.
Step 7:
To add your ribbon ties, put one ribbon on the bottom of your tablecloth and one on top, but make sure they are both INSIDE the bias tape, so once you sew the bias tape you will sew the ribbon in.
![]() |
Here's the ribbon sewn in on both sides |
Step 8:
Continue sewing your bias tape all the way around. When you get back to where you started, trim off your bias tape about an inch past where your other ends starts. Fold your bias tape as neatly as possible and cover your other end by about 1/2" and sew over. (backstitch to hold stitching in place)
Completed Project:
Project found at: http://sewingorsomething.blogspot.com
Subscribe to:
Posts (Atom)