Showing posts with label helpful. Show all posts

Wednesday, January 18, 2012

Sewing Tips Compilation #3

If you've missed our daily sewing tips on Twitter, no worries, we've got them all compiled together with pics. Some of them may be common sense, but just take a refresher and you'll be able to prevent yourself from any accidents and end up with a great project! *Pics will be added along the way*

We're back with our third addition of sewing tips, keep updated as we add new ones!

[Sewing Tip 1] Press your seam open after sewing for a polished look. Less homemade, looks more professional.


[Sewing Tip 2] When sewing a square project or a corner, trim off a triangle on your seam allowance 1/8" away from sewn corner. This prevents bulkage when flipping project inside out. *PS- This example is from our reference board in studio, which also includes examples of stitches, hemming, pockets and other sewing techniques!


[Sewing Tip 3] When attaching fusible interfacing always use a fabric guard in between iron and interfacing to prevent glue from sticking to iron.


[Sewing Tip 4] Change your sewing machine needle after 2 major projects.

[Sewing Tip 5] This might be common sense but only use fabric scissors for fabric, never paper!


[Sewing Tip 6] No empty bobbins? Wrap a new thread color over top of a half full bobbin.


[Sewing Tip 7] Test your thread tension using a scrap of your project fabric before sewing your project.

[Sewing Tip 8] Purchase a pair on thread clippers like these. Easier to trim threads then big scissors. Very handy!


[Sewing Tip 9] To find your natural waistline measurement, bend to the side and take your measurement where it hinges.

[Sewing Tip 10] When hand sewing silk use a thinner guage needle so needle can glide through fabric easily and leaves smaller, less noticeable holes.

[Sewing Tip 11] Dont rush sewing during the last steps of your project. That's when the most mistakes happen.

[Sewing Tip 12] Trim off the hanging threads after sewing a seam. This ensures no threads will be pulled into machine later when sewing.

[Sewing Tip 13] Invest in a magnetic pins holder. Easier to grab and store pins! Buy from Dressew, it's cheap.


[Sewing Tip 14] If you sew a lot like us, ensure you clean out any fuzz & threads from around your bobbin area. Better quality stitches.

[Sewing Tip 15] Backstitching is used to re-enforce a seam. Only do 3-4 stitches, anymore will just add unneccessary bulk.

[Sewing Tip 16] Keep a cover on you sewing machines while not in use. Decreases the amount of fuzz/dust that can accumulate.


[Sewing Tip 17] When pressing a garment press all seam allowances towards the back or down.

[Sewing Tip 18] No serger? Use a zig zag stitch close to the seam allowance raw edge instead. Or come and use ours :)


[Sewing Tip 19] When threading your machine ensure presser foot is up. This ensures thread sits properly in tension areas.


[Sewing Tip 20] Pre-wash fabric prior to sewing. If you forget, then wash in cold water and hang to dry to maintain original shape.

[Sewing Tip 21] Avoid lots of pins when sewing with silk, decreases the amount of holes. Or just pin in the seam allowance area.

[Sewing Tip 22] Prior to sewing a hem, press it in, so that the hem lays flat while sewing. Make sewing easy!

[Sewing Tip 23] Need to decrease the height /width of a garment? Do it from the middle and re-curve outer seams. Never from the outsides.

[Sewing Tip 24] Keep food and drinks away from machines and irons. Who wants sandwich crumbs melted into their project??

[Sewing Tip 25] Always have black, white, and another colour you use often in thread.


[Sewing Tip 26] When using a seam ripper remember the blade is in the valley of the ripper. Don’t pick away at your thread using the tip, use the valley.


[Sewing Tip 27] Have your fabric sheers sharpened at least once a year or earlier if you sew often. Keeps you and your fabric sane!

[Sewing Tip 28] Lost one button on your blazer and can’t find a replacement? Replace all the buttons for a fresh look. Or keep a bunch of extra buttons around like us! 


[Sewing Tip 29] Always place the big pattern pieces first on the fabric, then the small ones will fit around.

[Sewing Tip 30] Keep a pin holder beside your sewing machine or you will have pins everywhere.


[Sewing Tip 31] Prior to cutting out pattern, ensure fabric is good sides facing each other.   

[Sewing Tip 32] Invest in a quilting ruler. Handy for pattern drafting and sewing. These come in different sizes so pick one that youll use most often, or just get both for convenience.


[Sewing Tip 33] Your machine is dead & you want to get rid of it. Take it to a machine store and they can recycle for you.  

[Sewing Tip 34] Pins dull over time, replace them if they are no longer gliding through fabric smoothly. 

[Sewing Tip 35] There are different heights to bobbins, always use the correct height bobbin for your machine. Make sure you don't mix up domestic and industrial bobbins!


[Sewing Tip 36] Chalk out your sew line prior to sewing if it’s a detailed seam. Extra time but your seam will be flawless.

[Sewing Tip 37] When using chalk apply lightly on fabric or it might take several washes to remove.


**NEW**

[Sewing TIp 38] Use heavy weight drafting paper instead of regular paper to extend the life of patterns.


[Sewing Tip 39] Keep all your patterns organized with pattern hooks & a hole puncher.


[Sewing Tip 40] Store fabric in clear containers. You can see your fabric easily and is dust-free.


[Sewing Tip 41] Sew all seams at 2.5 stitch length. This size creates a secure seam.


[Sewing Tip 42] Sewing an appliqué onto a garmnet? Attach fusible interfacing to back of appliqué for easy sew.

[Sewing Tip 43] If you don't have an iron & in desperate need use a flat iron! Handy for dress shirts (and travel!)

[Sewing Tip 44] Steam a zipper seam instead of pressing directly so you don't melt it! Use your fingers to press seam flat. 

[Sewing Tip 45] Machine light too dark? Install a 2nd light, like the ones at in studio, so you can see exactly what you’re sewing.


[Sewing Tip 46] Altering the shape? Try the garment on inside out so you can mark where to sew and hide chalk lines too.

[Sewing Tip 47] Your grain line is parallel to your selvage edge. Selvage edge is the uncut edge.

[Sewing Tip 48] Sewing a ton like us? Invest in a Cone Thread Holder like this one. PS- We sell them too!


[Sewing Tip 49] Do not pre-wash wool fabric, steam it instead!

[Sewing Tip 50] If you are serging an item with rounded corners, start serging on a straight edge not a corner.

[Sewing Tip 51] Chalk comes in different forms & colours- tailors chalk, roller wheel, etc.. Find one that works best for your fabric.


[Sewing Tip 52] Making patterns? Use a tracing wheel on top of your pattern paper so you can easily create the pattern.

[Sewing Tip 54] Something feels funky when sewing with your machine? Stop right away, check the bobbin case, and rethread if needed.

[Sewing Tip 55] When using the hand wheel on sewing machine, remember only turns towards you! Never away from you.

[Sewing Tip 56] When using diff fabrics, always test it on a scrap first to see if you need to adjust tension or stitch length.

[Sewing Tip 57] Cutting out patterns? Get weights like these to hold the pattern down while you work.


[Sewing Tip 58] When hand sewing keep an eye on how much thread you have left to ensure you can still tie a knot.

[Sewing Tip 59] You don`t need machines with lots of fancy stitches. Straight, zigzag, and button hole are good enough.


[Sewing Tip 60] Don't throw away your scrap fabric. You can always use it as test fabric. Ziplock it away as storage.


[Sewing Tip 61] Don't have a serger or machine with zigzag stitch? Use pinking shears to finish a raw edge


[Sewing Tip 62] Create your own binding with a strip of fabric and press the folds as shown in photo


Follow us on Twitter for more daily sewing tips!

Saturday, October 22, 2011

Sewing Tips Compilation #2

If you haven't noticed, we've been posting daily sewing tips on Twitter, but we've decided to compile them all together in a blog post every few weeks or so. Some of them may be common sense, but just take a refresher and you'll be able to prevent yourself from any accidents and end up with a great project! *Pics will be added along the way*

Here is our second addition of sewing tips, keep updated as we add new ones!

[Sewing Tip 1] Press your seam open after sewing for a polished look. Less homemade, looks more professional.


[Sewing Tip 2] When sewing a square project or a corner, trim off a triangle on your seam allowance 1/8" away from sewn corner. This prevents bulkage when flipping project inside out. *PS- This example is from our reference board in studio, which also includes examples of stitches, hemming, pockets and other sewing techniques!


[Sewing Tip 3] When attaching fusible interfacing always use a fabric guard in between iron and interfacing to prevent glue from sticking to iron.


[Sewing Tip 4] Change your sewing machine needle after 2 major projects.

[Sewing Tip 5] This might be common sense but only use fabric scissors for fabric, never paper!


[Sewing Tip 6] No empty bobbins? Wrap a new thread color over top of a half full bobbin.


[Sewing Tip 7] Test your thread tension using a scrap of your project fabric before sewing your project.

[Sewing Tip 8] Purchase a pair on thread clippers like these. Easier to trim threads then big scissors. Very handy!


[Sewing Tip 9] To find your natural waistline measurement, bend to the side and take your measurement where it hinges.

[Sewing Tip 10] When hand sewing silk use a thinner guage needle so needle can glide through fabric easily and leaves smaller, less noticeable holes.

[Sewing Tip 11] Dont rush sewing during the last steps of your project. That's when the most mistakes happen.

[Sewing Tip 12] Trim off the hanging threads after sewing a seam. This ensures no threads will be pulled into machine later when sewing.

[Sewing Tip 13] Invest in a magnetic pins holder. Easier to grab and store pins! Buy from Dressew, it's cheap.


[Sewing Tip 14] If you sew a lot like us, ensure you clean out any fuzz & threads from around your bobbin area. Better quality stitches.

[Sewing Tip 15] Backstitching is used to re-enforce a seam. Only do 3-4 stitches, anymore will just add unneccessary bulk.

[Sewing Tip 16] Keep a cover on you sewing machines while not in use. Decreases the amount of fuzz/dust that can accumulate.


[Sewing Tip 17] When pressing a garment press all seam allowances towards the back or down.

[Sewing Tip 18] No serger? Use a zig zag stitch close to the seam allowance raw edge instead. Or come and use ours :)


[Sewing Tip 19] When threading your machine ensure presser foot is up. This ensures thread sits properly in tension areas.


[Sewing Tip 20] Pre-wash fabric prior to sewing. If you forget, then wash in cold water and hang to dry to maintain original shape.

[Sewing Tip 21] Avoid lots of pins when sewing with silk, decreases the amount of holes. Or just pin in the seam allowance area.

[Sewing Tip 22] Prior to sewing a hem, press it in, so that the hem lays flat while sewing. Make sewing easy!

[Sewing Tip 23] Need to decrease the height /width of a garment? Do it from the middle and re-curve outer seams. Never from the outsides.

[Sewing Tip 24] Keep food and drinks away from machines and irons. Who wants sandwich crumbs melted into their project??

*NEW*

[Sewing Tip 25] Always have black, white, and another colour you use often in thread.


[Sewing Tip 26] When using a seam ripper remember the blade is in the valley of the ripper. Don’t pick away at your thread using the tip, use the valley.


[Sewing Tip 27] Have your fabric sheers sharpened at least once a year or earlier if you sew often. Keeps you and your fabric sane!

[Sewing Tip 28] Lost one button on your blazer and can’t find a replacement? Replace all the buttons for a fresh look. Or keep a bunch of extra buttons around like us! 


[Sewing Tip 29] Always place the big pattern pieces first on the fabric, then the small ones will fit around.

[Sewing Tip 30] Keep a pin holder beside your sewing machine or you will have pins everywhere.


[Sewing Tip 31] Prior to cutting out pattern, ensure fabric is good sides facing each other.   

[Sewing Tip 32] Invest in a quilting ruler. Handy for pattern drafting and sewing. These come in different sizes so pick one that youll use most often, or just get both for convenience.


[Sewing Tip 33] Your machine dead & you want to get rid of it. Take it to a machine store and they can recycle for you.  

[Sewing Tip 34] Pins dull over time, replace them if they are no longer gliding through fabric smoothly. 

[Sewing Tip 35] There are different heights to bobbins, always use the correct height bobbin for your machine. Make sure you don't mix up domestic and industrial bobbins!


[Sewing Tip 36] Chalk out your sew line prior to sewing if it’s a detailed seam. Extra time but your seam will be flawless.

[Sewing Tip 37] When using chalk apply lightly on fabric or it might take several washes to remove.

[Sewing TIp 38] Use heavy weight drafting paper instead of regular paper to extend the life of patterns.


Follow us on Twitter for more daily sewing tips!
Check back soon for another compilation with more pics!

Saturday, October 15, 2011

What's In Our Studio? An Intro to Sewing Machines

      SWFDS is home to many varieties of sewing machines so you will always have the tools needed to complete your sewing projects! In this blog post, we'll be introducing you to all our machines, what type they are, what kind of projects to use them for, and what they look like!

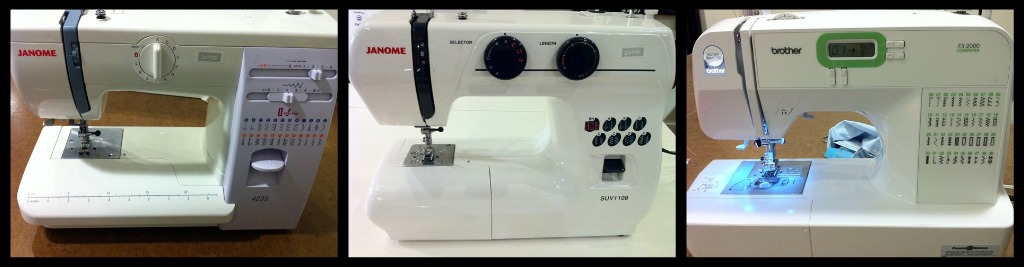
Domestic:  (3 Brother, 3 Janome in studio)
These are great for the beginner sewer and are very easy to use. Domestic machines are also the most portable out of any sewing machine. They can be used to sew any project and almost all models will offer different types of stitches like zigzag, buttonhole, and other designs. We have 6 machines in total in studio, with 3 different models so come in to learn how to use each one!

Our two Janome models and the Brother

Stitches from the Brother machine, similar functions on the Janomes

Industrial: (Juki, Mason in studio)
Industrial sewing machines are very similar to domestic ones, except that they are larger, much faster, and more powerful. Recommended for intermediate and advanced sewers as the machines do run very fast. They are actually used in the fashion industry to produce and manufacture clothing. They can be used to sew any project and are great for thicker fabrics like leather or sewing through many layers. There is a Juki and a Mason in studio and we love using these for tougher projects.

Mason and Juki

Serger: (Janome)
Also known as overlock, these machines work to finish off a raw edge and prevent further shredding of fabric. They are very easy to use and a personal favourite to work with! The serger also features a cutting blade that snips off excess fabric then serges the edge. When serging two pieces of fabric at the same time, it sews them together as well. This makes it possible to sew an entire project with just the serger! (The sweater from our DIY tutorial here was made entirely with a serger!)

Janome Serger

Stiches made from a serger! Closes any raw edge

Coverstitch: (Janome)
The newest addition to our studio! It works best on knit fabrics like t-shirts and tank tops. It closes off a raw edge similarly to the serger but those stitches will only show on the bad side of the fabric while the clean stitches stay on the good side. However, the machine must sew continuously on fabric, so be prepared with scrap fabric to end with before sewing another project.

Janome Coverstitch
Various stitches
Stitches made from a coverstitch! Back and front sides.

Hope you enjoyed this short post introducing the machines we have in studio!
Drop by and visit us at 10 - 319 W Pender to learn how to use one of these!

FashionDIY Artist signing out~