Spring is almost here and the perfect piece to ease out of winter is.. skirts! Wear with fun tights or dress it up with heels. Follow these simples steps to make your own!
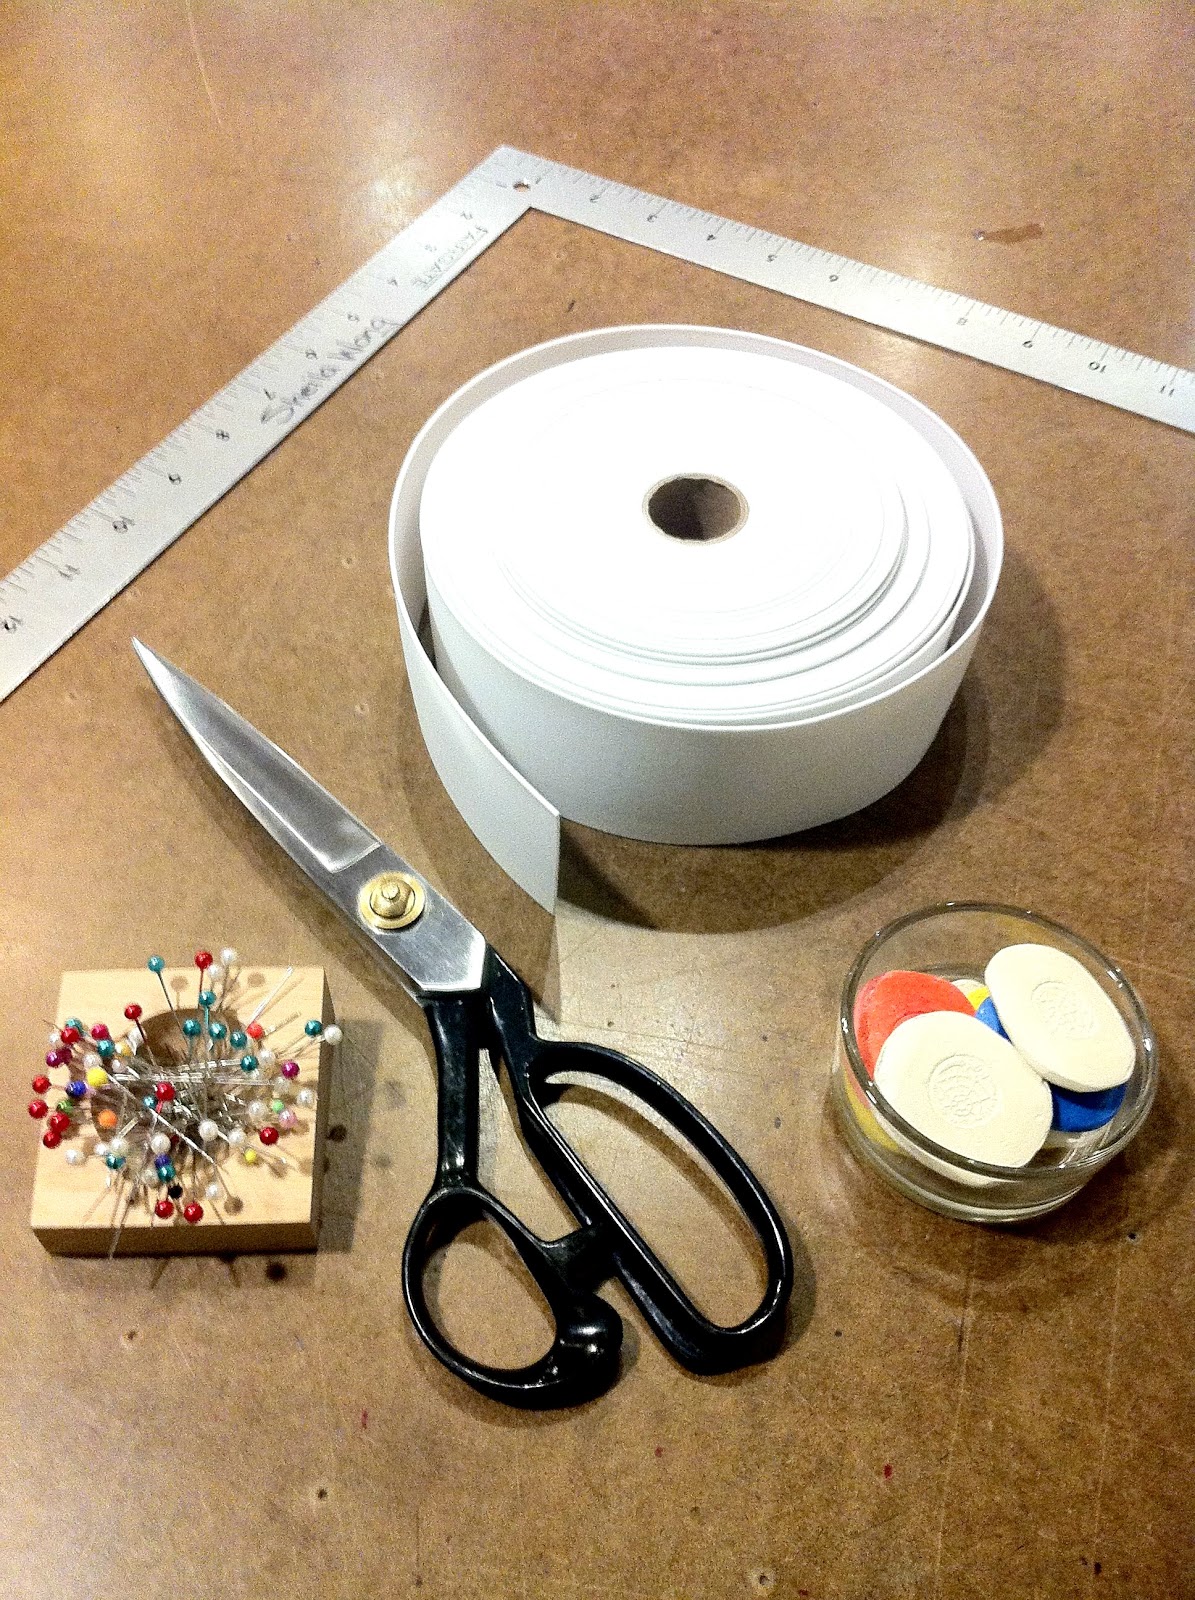
Materials Needed:
0.5 - 2m of stretch fabric (Polyester/Spandex blends are optimal, amount varies depending on length of your skirt)
0.75 - 0.9m of 2" width elastic
Sewing machine (not pictured)
Iron and iron board (not pictured)
Fabric shears
Quilting ruler
L Ruler (optional)
Pins
Chalk
Safety Pin (not pictured)
Instructions:
1. Lay the fabric flat good sides together.
2. For our measurements, we created a square 21 1/2" by 21 1/2", but extend these measurements to fit a longer skirt. (21 1/2" by 27 1/2") Chalk the box, and cut it out. Please note these measurements fits a 25-27" waist.
3. Place the two pieces good sides together, and pin the side seams. Sew at 1/2" seam allowance down both sides, and backstitch.
4. Press seams open if needed.
5. Fold in the waist by 3" so the top should be bad sides facing each other. Pin and sew at 2.5" all the way around, leaving a 3" opening for the elastic. Backstitch at the start and end points.
6. Measure around your waist or where you want the skirt to sit. Subtract 1" from the measurement and cut the elastic to that length.
7. Attach a safety pin to the elastic and use it to feed the elastic through the opening. Make sure it is laying flat all around.
8. Sew the elastic together at 1/2" from the raw edges. Push it into the casing area.
9. Top stitch the elastic in, closing the 3" opening. Remember to backstitch.
10. Fold the hem in at 1", so that bad sides face each other. Topstitch all the way around at 3/4", starting at a side seam.
Tada! A fabulous fashion statement in ten steps!
Hope you all enjoy wearing your new high waisted skirts, share with us the outfit :)
Until next time, happy sewing,
FashionDIY Artista!
Showing posts with label tutorial. Show all posts
Wednesday, February 22, 2012
Wednesday, January 11, 2012
[DIY Tutorial] Infinity Scarf!
We are back with another tutorial! One of our most popular classes for you to make on your own at home.. the infinity scarf! VERY simple and easy to make and wear!
Materials needed:
0.8 metres of jersey stretch fabric
Matching thread
Quilting ruler
Chalk
Fabric Shears
Iron & Iron board
Sewing machine
Instructions:
1) Lie the fabric flat on the table, folded in half with good sides together and salvaged edge closest to you.
2) Trim the two raw ends so that they are parallel. (Not the salvaged edge)
3) On one of the salvaged corners of the fabric, use chalk to mark four inches up. Use the ruler, and chalk a line descending to the other salvaged corner. This is to create a nice cascading final look for the scarf. (Click to enlarge)
4) Sew the fabric good sides together on the chalked line, then trim excess neatly.
5) Press seams open.
6) Stretch the tube to give it shape, flip it inside out and you're done!
How easy was that! Congrats on a fabulous new scarf. Psst- share what you wear with yours!
Cheers,
FashionDIY Artista
Materials needed:
0.8 metres of jersey stretch fabric
Matching thread
Quilting ruler
Chalk
Fabric Shears
Iron & Iron board
Sewing machine
Instructions:
1) Lie the fabric flat on the table, folded in half with good sides together and salvaged edge closest to you.
2) Trim the two raw ends so that they are parallel. (Not the salvaged edge)
3) On one of the salvaged corners of the fabric, use chalk to mark four inches up. Use the ruler, and chalk a line descending to the other salvaged corner. This is to create a nice cascading final look for the scarf. (Click to enlarge)
5) Press seams open.
6) Stretch the tube to give it shape, flip it inside out and you're done!
How easy was that! Congrats on a fabulous new scarf. Psst- share what you wear with yours!
Cheers,
FashionDIY Artista
Labels:
beginner,
diy,
easy,
infinity scarf,
scarf,
sewing studio,
swfds,
tutorial,
workshop
Saturday, October 29, 2011
[DIY Tutorial] Mini Make Up Pouch in 10 Steps or Less!
In today's tutorial, we will be showing you how to make a mini make up pouch, complete with a cute button closure. It's simple and won't take you too long so keep reading to find out how to make your own!
Another heads up, we will be teaching free on site workshops (similar to our tutorials) at the upcoming One of A Kind Show in Vancouver from December 8-11! More information on the show and where to buy tickets can be found here: http://oneofakindvancouver.com/index.php.
Materials Needed:
Sewing Machine (not pictured)
Iron (not pictured)
12" x 7" pieces in exterior fabric, lining, and fusible interfacing
Matching thread
Button of your choice
2" piece of elastic (1/4" width)
Instructions:
1. Attach the fusible interfacing to the bad side of the fabric using an iron. Be sure to use a fabric guard to protect your iron.
2. Place lining and exterior fabric good sides together, lining up the raw edges.
3. On one end of the fabric, chalk mark at the half way mark. Pin elastic at this mark with loop sandwiched between lining and exterior fabric with loop facing inside.
4. Chalk all four corners with at half an inch. This will make it easier to sew around the corners.
5. Pin all around to keep together when sewing. Be sure not to sew over pins!
6. Sew all around at half an inch seam allowance, pivoting at every corner with needle in. Remember to leave a 3" opening at the end without the elastic loop. Backstitch at the beginning and end.
7. Cut off bulk seam allowance as shown in picture. Now flip it inside out!
8. Press the rectangle flat.
9. Topstitch the open side at 1/8" seam allowance from the edge to close it. Backstitch to secure. Topstitch the side seams at 1/8" from the edge to create a pouch. Backstitch to secure.
10. Close the flap down and mark where the button should be placed. Hand sew button on the mark.
You're done! Your new makeup pouch should look something like this!
Hope you enjoyed this weeks tutorial!
This pouch is very versatile and would make a great gift as well :)
We will be teaching free workshops with similar projects at One of A Kind Show Vancouver from December 8-11! More info and purchase your tickets to the show here!
Another heads up, we will be teaching free on site workshops (similar to our tutorials) at the upcoming One of A Kind Show in Vancouver from December 8-11! More information on the show and where to buy tickets can be found here: http://oneofakindvancouver.com/index.php.
Materials Needed:
Sewing Machine (not pictured)
Iron (not pictured)
12" x 7" pieces in exterior fabric, lining, and fusible interfacing
Matching thread
Button of your choice
2" piece of elastic (1/4" width)
Instructions:
1. Attach the fusible interfacing to the bad side of the fabric using an iron. Be sure to use a fabric guard to protect your iron.
2. Place lining and exterior fabric good sides together, lining up the raw edges.
3. On one end of the fabric, chalk mark at the half way mark. Pin elastic at this mark with loop sandwiched between lining and exterior fabric with loop facing inside.
4. Chalk all four corners with at half an inch. This will make it easier to sew around the corners.
5. Pin all around to keep together when sewing. Be sure not to sew over pins!
6. Sew all around at half an inch seam allowance, pivoting at every corner with needle in. Remember to leave a 3" opening at the end without the elastic loop. Backstitch at the beginning and end.
8. Press the rectangle flat.
9. Topstitch the open side at 1/8" seam allowance from the edge to close it. Backstitch to secure. Topstitch the side seams at 1/8" from the edge to create a pouch. Backstitch to secure.
10. Close the flap down and mark where the button should be placed. Hand sew button on the mark.
You're done! Your new makeup pouch should look something like this!
Hope you enjoyed this weeks tutorial!
This pouch is very versatile and would make a great gift as well :)
We will be teaching free workshops with similar projects at One of A Kind Show Vancouver from December 8-11! More info and purchase your tickets to the show here!
Have a lovely Halloween!
- FashionDIY Artista
Monday, October 3, 2011
[DIY Tutorial] Headbands!
Headbands are so multipurpose and can be styled in so many ways. They can be worn anytime and anywhere; exercise, studying, formal events, parties, and more. Add a flower for a girly touch, braid leather and suede for a boho look, or stud it for some rocker style! Follow this short and easy tutorial to make your own headband~
Materials needed:
Sewing machine
0.4m of elastic (width, elasticity, colour is up to you)
Matching thread
Fabric shears
Measuring tape
Pin
Instructions:
1. Take the measuring tape and wrap it around your head where you want the headband to sit. Use that measurement and cut the elastic to that length. (We used 22")
2. Fold the elastic in half, good sides together, pin the ends together about an inch from the edges.
3. Sew the ends together half an inch from the ends. The elastic should now look something like this, except the ends will not be curled since we are sewing them down in the next step.
4. Lay the elastic flat, bottom side up, flatten the two raw edges down and sew straight down both edges.
Tada, You have just made your own basic headband!
Add your own touch. Experiment with multiple elastics, try different thicknesses, add a flower, stud it; the possibilities are endless!
Here are some headbands we've experimented with..
For the braided look, make the braid first then attach them together with a smaller version of the headband you just made!

Till next time, Happy Sewing!
Enjoy your new headbands :)
- FashionDIY Artist
Materials needed:
Sewing machine
0.4m of elastic (width, elasticity, colour is up to you)
Matching thread
Fabric shears
Measuring tape
Pin
Instructions:
1. Take the measuring tape and wrap it around your head where you want the headband to sit. Use that measurement and cut the elastic to that length. (We used 22")
2. Fold the elastic in half, good sides together, pin the ends together about an inch from the edges.
3. Sew the ends together half an inch from the ends. The elastic should now look something like this, except the ends will not be curled since we are sewing them down in the next step.
4. Lay the elastic flat, bottom side up, flatten the two raw edges down and sew straight down both edges.
Tada, You have just made your own basic headband!
Add your own touch. Experiment with multiple elastics, try different thicknesses, add a flower, stud it; the possibilities are endless!
Here are some headbands we've experimented with..
For the braided look, make the braid first then attach them together with a smaller version of the headband you just made!

Till next time, Happy Sewing!
Enjoy your new headbands :)
- FashionDIY Artist
Saturday, September 17, 2011
[DIY Tutorial] Comfy Sweater
In this tutorial, we'll be teaching you how to sew your very own sweater!
We'll be using a different technique this time with very few measurements and no patterns.
It's a bit longer than usual but quite simple and you'll love telling people you made your own sweater!
Personalize it by changing the length, the neckline or even adding a design on the front :)
Materials needed:
Instructions:
These instructions are detailed, so please read carefully, click to enlarge pictures if necessary and read through before cutting anything to avoid mistakes! :)
1. This diagram will show you where to fold your fabric and trace out the sweater. Click to enlarge! Please excuse the quick sketch of the sweaters, they are not to scale. It should give you an idea of how to place your sweater on the fold and where to chalk it. It'll ensure that you have enough fabric for your sweater and a lot of extra scraps too. (Black: good side of fabric, White: bad side of fabric)
2. Lay your fabric flat on the table. Take your sweater, fold it in half with the front facing you, matching the shoulder and side seams. Fold your fabric, bad side up, and lay the sweater on top with the folds right on top of each other.
3. Using chalk, trace around the folded sweater, pulling the sleeve over so you can trace the edge. Hold the waistband ribbing and neckline ribbing down so you can trace around them as well.
4. Repeat steps 1 & 2 with the back of the sweater. *If you are a bit confused as to where to fold and cut, please refer back to Step 1.
5. Cut both pieces out and you should have something looking like this.
6. Using the scraps, Cut two pieces that are more than double the size of your sleeve. Fold each in half, and put one aside for now. Taking your sleeve of your sweater, lay it flat making sure that the folded sleeve and folded fabric are right on top of each other. Trace around it like the previous steps, holding the wrist ribbing and folding the rest of the sweater over so you can just trace the sleeve.
7. Cut the sleeve out and keep it folded. Take the other scrap previously set aside and fold it in half. Place the fold of the sleeve you just cut, right on the of the folded fabric. Pin the two pieces together. This is to ensure that the sleeves are exactly the same.*It's difficult to see the second sleeve in the picture, but the white outline is where it should be*
8. Cut the second sleeve out and you should have two sleeves like this. (These are still folded but you can unfold them) Set these sleeves aside for now.
9. Lay the two sweater pieces flat on top of each other, good sides together. Pin them together at both shoulders.
10. Serge the shoulder seams, making sure the pieces are good sides together. (*If you dont have a serger, use a sewing machine on the zigzag stitch. Keep it on that stitch for the rest of the project)
After serging, the sweater pieces should be attached like this.
11. Lay it with the bad side up. Turn it 90 degrees until one of the serged seams is facing you. Take one of the sleeves, open it with the bad side up and place the edges together, the serged shoulder seam with the middle of the edge of the sleeve. Start pinning from the center. Pin both sleeves, good sides together, bad sides facing up. If the fabric is scrunched or wrinkly, dont worry, just make sure the edges are flat on top of each other.
12. After serging both sleeves, the sweater should look like this. Now fold it in half like this and match the side seams together. Make it sure the bad side is facing up.
13. Match sleeve edges and side seams on each side and pin. Starting at the sleeve, serge all the way down to the end of the sleeve and continue down the side seam. Do this to both sides. (Make sure all the seams are lined up, especially at the armpit or else there will be a hole there!)
14. Flip it inside out and press seams with an iron. If you want an edgy sweater with raw edges, your sweater is done! To add cuffs, waistband and neckline, continue on :)
15. To make the ribbing, first measure around your hips or where you want the sweater to sit. Then take off an inch from that measurement. (Ours was 29") If the ribbing is very stretchy, use your discretion and take off a few inches. If you dont have ribbing, the extra fabric will work fine.
16. Taking the ribbing/extra fabric, measure a rectangle 4" wide by 29" (use your measurement here.)
If you like wider cuffs, measure 5" instead.
17. Cut the rectangle out, fold in half, good sides together, and pin the ends.
18. Serge the ends together and flip it inside out.
19. The ribbing should now be attached in a circle. Fold the raw edges together with good sides facing you.
Serge the raw edges together.
20. Slide the bottom edge of the sweater inside the ribbing so that the edge lines up with the serged edge of the ribbing. Good sides together! Make sure the seam of the ribbing matches with one of the sweater side seams.
21. Pin at the seam of the ribbing first then the find the middle of the ribbing and pin it to the other sweater side seam. The ribbing will be smaller than the sweater so you will need to stretch the ribbing, in order to pin around the entire sweater, matching the raw sweater edge to the serged ribbing edge. It should have a scrunched look.
22. Serge around the bottom edge, sewing the ribbing to the sweater. You will need to stretch the ribbing so that it is flat against the fabric when you serge them together. Remember, good sides together!
23. For the cuffs, you will be the repeating steps 17-22. This time, you will need two rectangles, 7" by 4". Fold them in half, good sides together, pin and serge the ends. Flip it inside out, match the raw edges together, good side facing you, and serge around the cuff.
24. Because the cuffs are in a circle, serge carefully and make sure you don't serge the cuff closed!
25. Attach them to the sleeves the same way as the waistband. Refer back to steps 20-22.
26. For the neckline, its just like the waistband and cuff ribbing, but this time the rectangle will be 2" wide. For the length, you will need to measure the neckline of the sweater. Ours was a wide neck so we used 28". Do the exact same steps from 17-22.
27. Press all the seams with an iron for a finished look.
28. You're finished! Congrats on making your very own sweater!
Thanks for reading through this detailed tutorial and hope you enjoyed it!
Add your own touch to your sweater by sewing on some designs or maybe changing the neckline or making it short sleeved? (We added Elmo's face to ours :D)
Show us how your sweater turned out!
Till next time, Happy sewing!
FashionDIY Artist signing out~
We'll be using a different technique this time with very few measurements and no patterns.
It's a bit longer than usual but quite simple and you'll love telling people you made your own sweater!
Personalize it by changing the length, the neckline or even adding a design on the front :)
![]() |
| Our very own Elmo sweater! |
Materials needed:
Serger (this entire project was made with a serger, but if you dont have one, use a sewing machine on a zigzag stitch)
Sewing machine (optional)
Iron and ironing board (not pictured)
1m of jersey stretch fabric; thick or thin is up to you
0.2m of ribbing (if you can't find ribbing to match your fabric colour, the scraps from your fabric will work fine; we made our ribbing from scraps)
A sweater you already own (with a shape and size that you really like)
Quilting ruler
Fabric shears
Mini Snippers
Pins
Chalk
Instructions:
These instructions are detailed, so please read carefully, click to enlarge pictures if necessary and read through before cutting anything to avoid mistakes! :)
1. This diagram will show you where to fold your fabric and trace out the sweater. Click to enlarge! Please excuse the quick sketch of the sweaters, they are not to scale. It should give you an idea of how to place your sweater on the fold and where to chalk it. It'll ensure that you have enough fabric for your sweater and a lot of extra scraps too. (Black: good side of fabric, White: bad side of fabric)
2. Lay your fabric flat on the table. Take your sweater, fold it in half with the front facing you, matching the shoulder and side seams. Fold your fabric, bad side up, and lay the sweater on top with the folds right on top of each other.
3. Using chalk, trace around the folded sweater, pulling the sleeve over so you can trace the edge. Hold the waistband ribbing and neckline ribbing down so you can trace around them as well.
4. Repeat steps 1 & 2 with the back of the sweater. *If you are a bit confused as to where to fold and cut, please refer back to Step 1.
5. Cut both pieces out and you should have something looking like this.
6. Using the scraps, Cut two pieces that are more than double the size of your sleeve. Fold each in half, and put one aside for now. Taking your sleeve of your sweater, lay it flat making sure that the folded sleeve and folded fabric are right on top of each other. Trace around it like the previous steps, holding the wrist ribbing and folding the rest of the sweater over so you can just trace the sleeve.
7. Cut the sleeve out and keep it folded. Take the other scrap previously set aside and fold it in half. Place the fold of the sleeve you just cut, right on the of the folded fabric. Pin the two pieces together. This is to ensure that the sleeves are exactly the same.*It's difficult to see the second sleeve in the picture, but the white outline is where it should be*
8. Cut the second sleeve out and you should have two sleeves like this. (These are still folded but you can unfold them) Set these sleeves aside for now.
9. Lay the two sweater pieces flat on top of each other, good sides together. Pin them together at both shoulders.
10. Serge the shoulder seams, making sure the pieces are good sides together. (*If you dont have a serger, use a sewing machine on the zigzag stitch. Keep it on that stitch for the rest of the project)
After serging, the sweater pieces should be attached like this.
11. Lay it with the bad side up. Turn it 90 degrees until one of the serged seams is facing you. Take one of the sleeves, open it with the bad side up and place the edges together, the serged shoulder seam with the middle of the edge of the sleeve. Start pinning from the center. Pin both sleeves, good sides together, bad sides facing up. If the fabric is scrunched or wrinkly, dont worry, just make sure the edges are flat on top of each other.
12. After serging both sleeves, the sweater should look like this. Now fold it in half like this and match the side seams together. Make it sure the bad side is facing up.
13. Match sleeve edges and side seams on each side and pin. Starting at the sleeve, serge all the way down to the end of the sleeve and continue down the side seam. Do this to both sides. (Make sure all the seams are lined up, especially at the armpit or else there will be a hole there!)
14. Flip it inside out and press seams with an iron. If you want an edgy sweater with raw edges, your sweater is done! To add cuffs, waistband and neckline, continue on :)
15. To make the ribbing, first measure around your hips or where you want the sweater to sit. Then take off an inch from that measurement. (Ours was 29") If the ribbing is very stretchy, use your discretion and take off a few inches. If you dont have ribbing, the extra fabric will work fine.
16. Taking the ribbing/extra fabric, measure a rectangle 4" wide by 29" (use your measurement here.)
If you like wider cuffs, measure 5" instead.
17. Cut the rectangle out, fold in half, good sides together, and pin the ends.
18. Serge the ends together and flip it inside out.
19. The ribbing should now be attached in a circle. Fold the raw edges together with good sides facing you.
Serge the raw edges together.
20. Slide the bottom edge of the sweater inside the ribbing so that the edge lines up with the serged edge of the ribbing. Good sides together! Make sure the seam of the ribbing matches with one of the sweater side seams.
21. Pin at the seam of the ribbing first then the find the middle of the ribbing and pin it to the other sweater side seam. The ribbing will be smaller than the sweater so you will need to stretch the ribbing, in order to pin around the entire sweater, matching the raw sweater edge to the serged ribbing edge. It should have a scrunched look.
22. Serge around the bottom edge, sewing the ribbing to the sweater. You will need to stretch the ribbing so that it is flat against the fabric when you serge them together. Remember, good sides together!
23. For the cuffs, you will be the repeating steps 17-22. This time, you will need two rectangles, 7" by 4". Fold them in half, good sides together, pin and serge the ends. Flip it inside out, match the raw edges together, good side facing you, and serge around the cuff.
24. Because the cuffs are in a circle, serge carefully and make sure you don't serge the cuff closed!
25. Attach them to the sleeves the same way as the waistband. Refer back to steps 20-22.
26. For the neckline, its just like the waistband and cuff ribbing, but this time the rectangle will be 2" wide. For the length, you will need to measure the neckline of the sweater. Ours was a wide neck so we used 28". Do the exact same steps from 17-22.
28. You're finished! Congrats on making your very own sweater!
Thanks for reading through this detailed tutorial and hope you enjoyed it!
Add your own touch to your sweater by sewing on some designs or maybe changing the neckline or making it short sleeved? (We added Elmo's face to ours :D)
Show us how your sweater turned out!
Till next time, Happy sewing!
FashionDIY Artist signing out~
Labels:
comfy,
detailed,
diy,
do it yourself,
elmo,
fashion,
neckline,
off shoulder,
ribbing,
serger,
sewing,
sewing projects,
sweater,
swfds,
tutorial
Subscribe to:
Posts (Atom)